


In the vast landscape of digital communication, making a strong first impression is paramount. For businesses and creators, this often begins the moment someone joins your email list. A well-crafted welcome email isn’t just a courtesy; it’s a critical tool for engagement, trust-building, and setting the stage for a long-term relationship. This comprehensive guide will walk you through everything you need to know about setting up and optimizing your mailchimp automated email to new subscribers, ensuring your new audience feels valued from day one.
💡 Key Takeaways
- Learn to set up powerful automated welcome email sequences in Mailchimp.
- Discover strategies for crafting engaging content that resonates with new subscribers.
- Understand how to leverage automation for improved subscriber retention and conversion rates.
- Optimize your welcome series for maximum impact, from sign-up to sales.
“Automated welcome emails in Mailchimp aren’t just a courtesy; they’re your most potent tool for immediate engagement and long-term subscriber value. Don’t leave money on the table.”
— Emily Baker, Email Marketing Growth Hacker
Understanding how to leverage email automation, especially within a robust platform like Mailchimp, is fundamental to scaling your marketing efforts without increasing your manual workload. By automating your welcome sequence, you guarantee that every new subscriber receives a consistent, high-quality introduction to your brand, regardless of when they sign up.
In This Article
- — 💡 Key Takeaways
- → Why Automated Welcome Emails Are Non-Negotiable for New Subscribers
- → Mailchimp’s Automation Power: Your Digital Greeter
- — ⚙️ Understanding Mailchimp’s Customer Journeys
- → Setting Up Your Automated Mailchimp Welcome Email (Step-by-Step)
- — 1. Prepare Your Audience & Signup Form
- — 2. Navigate to Customer Journeys
- — 3. Choose Your Starting Point & Trigger
- — 4. Design Your Welcome Email
- — 5. Review and Publish
- → Crafting the Perfect Welcome Message
- — What to Include in Your Welcome Email
- — Best Practices for Engagement
- → Beyond the First Email: The Welcome Series
- — Why a Welcome Series?
- — Sample Welcome Series Flow (Mailchimp Customer Journey)
- → Measuring Success and Optimizing Your Welcome Flow
- — Key Metrics to Monitor
- — Iteration and Improvement
- → Conclusion: Automate Your Way to Better Subscriber Relationships
Why Automated Welcome Emails Are Non-Negotiable for New Subscribers
Think of a welcome email as the digital handshake with your new subscriber. It’s often the first direct communication they receive from you after opting in. The impact of this initial interaction cannot be overstated.
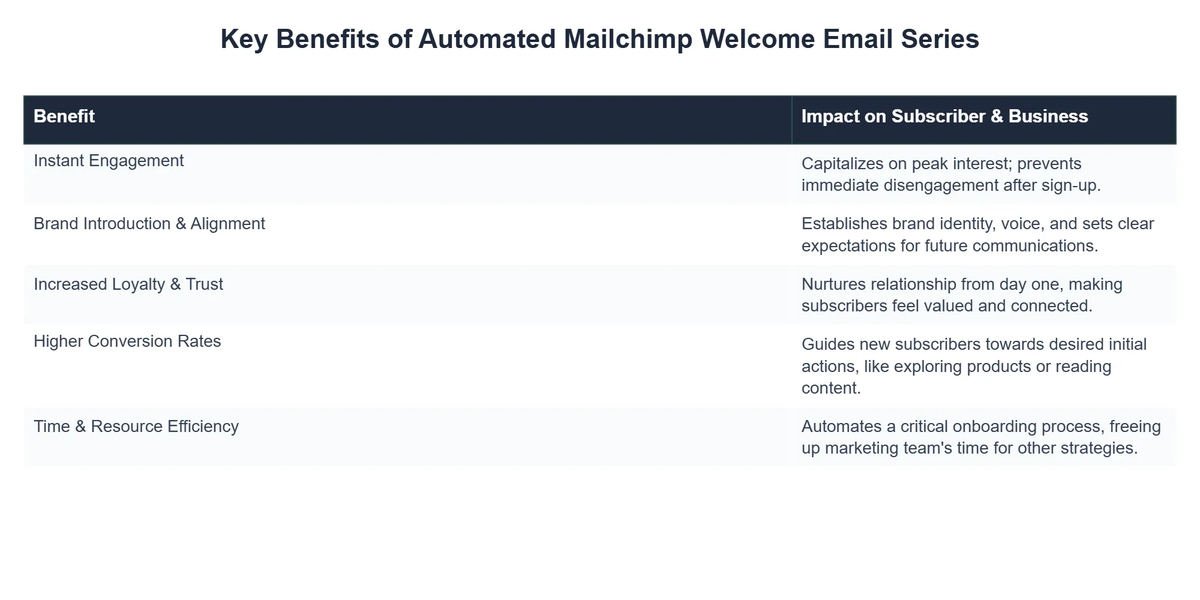
- ✅ Instant Gratification: Subscribers expect immediate acknowledgment. An automated email delivers this instantly, reinforcing their decision to join your list.
- ➡️ Strong First Impression: It’s your chance to introduce your brand’s voice, mission, and unique value proposition. A compelling welcome can significantly boost engagement with future emails.
- 💡 Set Expectations: Clearly communicate what kind of content they can expect, how often, and what benefits they’ll gain. This reduces unsubscribes down the line.
- 🤝 Build Trust and Authority: By delivering on your promise (e.g., a lead magnet, discount code), you establish credibility and show that you’re reliable.
- 📈 Higher Engagement Metrics: Welcome emails consistently boast some of the highest open and click-through rates across all email marketing campaigns. Leveraging this early engagement is crucial for long-term success.
- 💰 Drive Early Conversions: For e-commerce, a welcome email is an excellent opportunity to offer a first-purchase discount or highlight popular products, leading to immediate sales.
Mailchimp’s Automation Power: Your Digital Greeter
Mailchimp, a leading email marketing platform, provides powerful automation features that simplify the process of sending timely, relevant messages. Their “Customer Journeys” (formerly Automation) builder allows you to create sophisticated sequences based on subscriber behavior, making it ideal for onboarding new contacts.
Mailchimp
Mailchimp stands as a powerful, user-friendly email marketing and automation platform designed to help businesses of all sizes grow their audience, market their products, and increase sales. Its intuitive drag-and-drop builder, robust segmentation capabilities, and advanced analytics empower you to craft highly engaging campaigns that convert. From essential email newsletters to sophisticated automation workflows, Mailchimp provides the tools you need to nurture leads and build lasting customer relationships, all while driving a clear return on your marketing investment.
⚙️ Understanding Mailchimp’s Customer Journeys
Mailchimp’s Customer Journeys allow you to design personalized experiences for your audience. Instead of rigid automation workflows, it offers a visual builder where you can define triggers, actions, and branching logic. For a welcome series, the primary trigger is usually “when a contact joins an audience” or “when a contact is tagged.”
- ➡️ Visual Journey Builder: Drag-and-drop interface to map out your email sequence.
- 💡 Multiple Entry Points: Trigger journeys based on sign-ups, tags, purchases, or other behaviors.
- 🎯 Personalization Options: Dynamically insert subscriber data (names, preferences) to make emails more relevant.
- 📊 Reporting & Analytics: Track the performance of each email within your journey to optimize over time.
For more insights into managing your contacts and different sending scenarios, check out our guide on Mailchimp: Sending Emails to Non-Subscribers & List Management.
Automated Mailchimp Welcome Emails: Pros and Cons
Pros
- ✔Saves time and ensures immediate engagement with new subscribers.
- ✔Allows for consistent brand reinforcement and expectation setting.
- ✔Can be personalized to make new subscribers feel valued.
- ✔Provides data and analytics for performance tracking.
Cons
- ✖Requires initial setup time and careful content planning.
- ✖Lacks real-time adaptability once automated, if not set up with conditional logic.
- ✖Risk of content becoming outdated if not regularly reviewed and updated.
- ✖Reliance on Mailchimp’s specific features and template limitations.
Setting Up Your Automated Mailchimp Welcome Email (Step-by-Step)
Creating your first automated welcome email in Mailchimp is straightforward. Here’s a detailed guide:
1. Prepare Your Audience & Signup Form
- ✅ Choose or Create an Audience: Ensure you have the correct Mailchimp audience (formerly “list”) where your new subscribers will be added.
- ✍️ Verify Signup Method: Whether it’s a Mailchimp-hosted form, embedded form, or an integration with another tool (like a landing page builder), confirm new subscribers are successfully added to your chosen audience.
2. Navigate to Customer Journeys
- ➡️ Log in to your Mailchimp account.
- Click on Automations in the left-hand navigation menu.
- Select Customer Journeys.
- Click Create Journey.
3. Choose Your Starting Point & Trigger
- 💡 Select Build Your Own Journey to start from scratch, or choose a pre-built recipe if it fits your needs.
- Choose your Starting Point. For a welcome email, this will typically be “Joins an audience” or “Is tagged.”
- Select the specific Audience you want to trigger the welcome email for.
- Name your journey (e.g., “New Subscriber Welcome”).
4. Design Your Welcome Email
- ➕ Click the Add a step button (the plus icon) immediately after your starting point.
- Choose Send email as the action.
- Configure the Email:
- Subject Line: Craft a compelling subject line. (e.g., “Welcome to [Your Brand Name]!”, “Thanks for Subscribing!”).
- Sender Name & Email: Ensure these are professional and recognizable.
- Content: Click “Design Email” to use Mailchimp’s drag-and-drop editor. This is where you’ll build the actual email.
- Save and Continue.
5. Review and Publish
- 🧐 Review all steps of your journey to ensure accuracy.
- Click Turn On in the top right corner to activate your journey.
Mailchimp provides detailed documentation on creating automated welcome emails, which can be very helpful if you encounter specific issues: Create an Automated Welcome Email | Mailchimp.
Crafting the Perfect Welcome Message
The success of your automated welcome email hinges on its content. It needs to be engaging, informative, and provide clear value.

What to Include in Your Welcome Email
- 👋 A Warm Welcome: Express gratitude for joining your community.
- ✨ Reiterate Your Value Proposition: Briefly remind them why they signed up and what benefits they’ll receive.
- 🎁 Deliver Your Promise: If you offered a lead magnet (eBook, checklist, discount code), deliver it promptly.
- 🚀 Clear Call to Action (CTA): Guide them to the next step. This could be:
- “Shop Now”
- “Read Our Latest Blog Post”
- “Explore Our Services”
- “Follow Us on Social Media”
- 👤 Personalization: Use merge tags to automatically insert their first name (e.g., `|FNAME|`).
- 🌐 Social Media Links: Encourage them to connect with you on other platforms.
- ✅ Set Expectations: Tell them what kind of emails to expect and how often.
Best Practices for Engagement
- 📏 Keep it Concise: Get to the point. Subscribers are often scanning.
- 📱 Mobile-Friendly Design: Most emails are opened on mobile devices. Ensure your design is responsive.
- 🖼️ Eye-Catching Visuals: Use your brand’s colors, logo, and relevant images.
- 👂 Ask a Question (Optional): Encourage replies to boost engagement and improve deliverability.
- 🚫 Avoid Overwhelm: Don’t cram too much information or too many CTAs into one email.
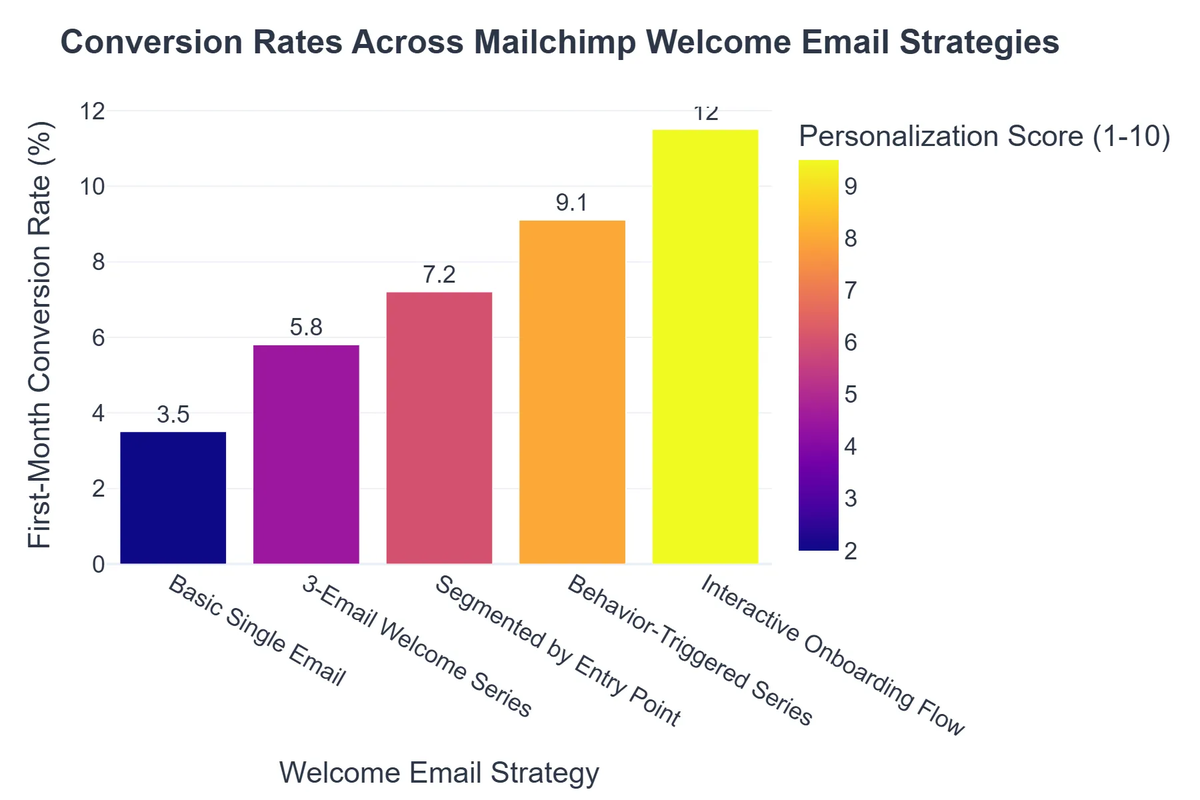
Beyond the First Email: The Welcome Series
While a single welcome email is a great start, a short welcome series (2-4 emails) can be even more effective for deeper engagement and onboarding. This allows you to space out information and guide subscribers through a more comprehensive introduction to your brand.
Why a Welcome Series?
- 💡 Drip-Feed Information: Prevent information overload by spreading content across several days.
- 📚 Educate & Nurture: Introduce different aspects of your business, product features, or content pillars.
- 🔄 Reinforce Value: Consistently remind subscribers of the benefits of being part of your community.
- 📈 Increase Conversions: Guide them naturally towards a purchase or desired action.
Sample Welcome Series Flow (Mailchimp Customer Journey)
- Email 1 (Day 0 – Instant): The initial welcome, thank you, deliver lead magnet/offer, and primary CTA.
- Email 2 (Day 2-3): Introduce your brand’s story, values, or highlight a popular blog post/product category. Focus on building connection.
- Email 3 (Day 4-7): Address common pain points your audience faces and how your product/service solves them. Include testimonials or social proof.
- Email 4 (Day 7-10): A stronger call to action, perhaps a limited-time offer, or an invitation to connect on social media/private community.
Developing a robust strategy for your entire email lifecycle, including a welcome series, is a core component of Email Marketing: The Ultimate Guide to Building Your List. For more advanced insights into performance, you might also find our article on Email Marketing Benchmarks: CPC & Mailchimp Performance useful.
Mailchimp also offers resources on building effective welcome series: A Winning Welcome Email Series | Mailchimp.
Measuring Success and Optimizing Your Welcome Flow
Setting up your automated welcome emails is just the first step. Continuous monitoring and optimization are key to maximizing their effectiveness.
Key Metrics to Monitor
- 📊 Open Rate: How many people are opening your welcome emails? A low open rate suggests issues with your subject line or sender reputation.
- 🖱️ Click-Through Rate (CTR): How many people are clicking on the links within your emails? A low CTR might indicate uncompelling content or unclear CTAs.
- ↩️ Unsubscribe Rate: While some unsubscribes are normal, a high rate in your welcome series could mean your messaging isn’t aligned with subscriber expectations.
- 💰 Conversion Rate: Are people completing the desired action (e.g., purchase, download) after receiving your welcome email?
Iteration and Improvement
- 🧪 A/B Testing: Mailchimp allows you to A/B test elements like subject lines, sender names, content blocks, and even send times within your automations. Test one variable at a time to determine what resonates best with your audience.
- 📝 Feedback Loop: Pay attention to replies (if encouraged) and social media comments related to your welcome sequence.
- 🔄 Regular Review: Periodically review your welcome series content. Is it still relevant? Does it reflect your current branding and offerings?
Recommended Video
Conclusion: Automate Your Way to Better Subscriber Relationships
Automated Mailchimp welcome emails are more than just a convenience; they are a cornerstone of effective email marketing. By setting up a thoughtful, well-designed welcome sequence, you not only make a powerful first impression but also lay the groundwork for deeper engagement, increased conversions, and a thriving community. Invest the time now to automate this critical touchpoint, and watch your subscriber relationships flourish.
How do I set up a welcome email automation in Mailchimp?
In Mailchimp, navigate to ‘Automations,’ then ‘Classic Automations,’ and select ‘Welcome new subscribers.’ You’ll then design your email content and set the trigger.
How many emails should be in a welcome series?
A welcome series can range from 1 to 5 emails. The ideal number depends on your business goals and the amount of information you need to convey. A common best practice is 3 emails for optimal impact.
Can I personalize Mailchimp welcome emails?
Yes, Mailchimp allows extensive personalization using merge tags based on subscriber data. This can include their name, location, or even specific preferences collected during signup to enhance relevance.
Mailchimp
Ready to take the next step? See how Mailchimp can help you achieve your goals.

